Monday 23 December 2013

More Craft Class Makes!


 These two cards were also made at craft classes with Lisa Baker. The one on the right has a main Hobby Art stamp as the jolly snowman and the scarf has been paper pieced with extra sections of the coordinating background papers. The sentiment is set on a snowflake punch, and co-ordinations card makes all the features pop. My favourite bit has to be the 'Fluffy Stuff' from Woodware though; this is applied sparingly (not like me!) and then heated. It magically puffs up and then goes solid. I do like a bit of magic!
This second card has one of the new Cuttlebug dies as the main feature. The die itself is a massive whole section with interlinking snowflakes. This makes a great effect when placed over the aperture as it is here. Some of the snowflakes are also decoupaged with die cut poinsettias for added interest. The card front has been embossed using a Crafts Too folder and the inside of the card has had a silver backing paper placed so it shows through to the front. Those amazing strings of bling are set into a hessian type fabric and can be cut to the size you want - ingenious! They have been layered onto a matching strip of the inside aperture cardstock.

Tuesday 17 December 2013

Paper Bows Wreath Card

Still creating Christmas cards! This was made at a craft class with Lisa Baker. The basic card is a new size from Craftwork Cards and is 7x7" square. The papers are all from the Christmas Post range from the same company, as are the paper bows and the topper. The paper bows pad has loads of bows in different sizes all in coordinating papers, so mixing them up is easy! The card was made cutting a basic circle shape from the middle of the card creating an aperture. The same size circle was then cut from red coordination card and then embossed with a Christmas style folder. The holly leaves were also cut from the same type of card and the red berries are Card Candi with Signo pen highlights.

Tuesday 10 December 2013

Wreath Swing Cards

Here are some swing cards made using Craftwork Cards Christmas Post papers, bows and some toppers from one of their pads. Card Cardi has been used to highlight the berries and pick up the card background colour. Small highlights with glitter Stickles have also been used to add interest. All the mat and layer shapes have been cut with Spellbinders Dies.

Tuesday 3 December 2013

Festive Sparkly Greetings

This is another 8x8 card (I'm getting more comfortable with this size now!).  I have cut some ivory Centura Pearl cardstock to fit my card as a topper and cut an aperture using a Labels Thirty Two die. I have then run the card stock through an Embossalicious Mistletoe Moments folder and run over the design with some gold gilding wax. The cut label shape has then been recessed back onto the card and the aperture raised up using foam pads. The flowers have been cut using Heartfelt Creations SunKissed Fleur dies, pressing Versamark through them and finally gold embossing to make them stand out. The sentiment is from the Die'sire Sentimentals Mistletoe Moments set, again heat embossed. A lot of gold and maybe could do with raising a little higher, but I quite like it.

Wednesday 27 November 2013

Trying To Keep It Simple...

This time I wanted to try and make an 8x8 card, but keep it simple. I do have a tendency to love adding lots of layers, yet I really admire those wonderful cards that are clean and simple. For this card I wanted to keep the colour choice minimal. I have created some background layers using plain white and craft card. The top layer consists of one third craft card, stamped with a holly stamp I got free with a magazine and then gold heat embossed. The rest of the front has an embossed white panel created using the Embossalicious Mistletoe Moments folder. The message stamp is the from Die'sire Mistletoe Kisses Sentimentals range, again gold embossed onto a Labels Thirty Two shape and layered onto a Vintage Label Three shape. The shiny flowers have been cut on pearly red paper using Spellbinders Layered Poinsettia dies, which I have then applied Versamark through, taken the die away and added pearly gold mica powder. So soft, but I like it! The pearls and ribbon are from Creative Expressions.

Tuesday 19 November 2013

Playing With Bag Charms

 In the run-up to the Christmas period I was asked to make several bag charms in various colours. I had great fun choosing beads; it was like leaving a child in a sweet shop! These are just some of the designs I created, none will ever be the same as a do not follow patterns. I have used lots of little charms to reflect a theme and the one on the right also has Vintaj impressed brass as a funky feature piece.
 

Tuesday 12 November 2013

I've Been Good All Year!

 With this card and the slight variation, I wanted to make use of the fantastic IndigoBlu words that I just had to get. I love the font and the cheeky message here, it allows so many options! The background paper is the Craftwork Cards Christmas Post papers again, (are you seeing a trend here...!) which have also been distressed with vintage photo ink. I have used a paper bow from the same kit and also a strip of paper for the middle detail. The fantastic sleigh and tiny holly leaves have been cut using my Cricut and the new December 25th cartridge. The middle circle has been cut with a Standard Circle Large Spellbinder die through decorative paper covered with double sided adhesive. Once cut I then covered with Micro Beads. This gives a great tactile effect which I am getting very fond of at the moment. The decorative circle behind has been cut with Spellbinders Delightful Circles die, and the label shape is a Labels Eight die. The bottom variation has the addition of some Glossy Accents on the stamp image and  little of the famous Card Candi!


Tuesday 5 November 2013

My Favourite Card Made For Christmas!

So, here is my favourite card made for the Christmas period. I have used some beautiful papers from the Craftwork Cards Christmas Post range in the background and layered the card up from there. The sentiment at the bottom is from a Woodware stamp with the main word being SNOW, but it also has some great phases. The gorgeous flourish is from IndigoBlu and has been stamped using distress ink in vintage photo. The rosettes have been made using a Tim Holtz decorative strip die called 'Mini Paper Rosettes'. The corners have been cut with dies from the Lea'bilities range and the rosette tops using a die from Spellbinders Create-A-Flake Three.I don't know why, but I really    like this one!


Monday 28 October 2013

Baby Humphrey!

 Here are a couple of new baby cards that I have recently had to quickly assemble, fortunately I have had some die-cut Crafter's Companion Humphrey's Corner decoupage to save me! I have to say the one thing I hate about craft...cutting any sort of decoupage! Hey presto, the cheat's answer to this becomes available and here I am! I have combined with some papers from my stash and cut the word 'baby' for the card below with my Cricut American Alphabet cartridge.  Some lace and odd bits of bobs complete these very simple cards.

Monday 21 October 2013

Christmas Post

Well, it had to start sometime! I started some Christmas cards a few days ago using the Craftwork Cards Christmas Post collection. The first one on the left was made using papers and toppers from the collection, along with some Christmas Paper Bows from the same company. The 'tree' was made using 3 of the bows and topped with a small poinsettia flower from Marianne Creatables and some Card Candi. The tree was then backed onto coordinating red card embossed with the Crafter's Companion Christmas Patchwork folder. The pot is a Card-io stamp stamped onto kraft card and distressed at the edges with vintage photo distress ink. The main background paper was also distressed for that vintage feel and matted onto coordinating green card with a kraft card blank. The circle sentiment was backed onto a Spellbinder's delightful circle die.
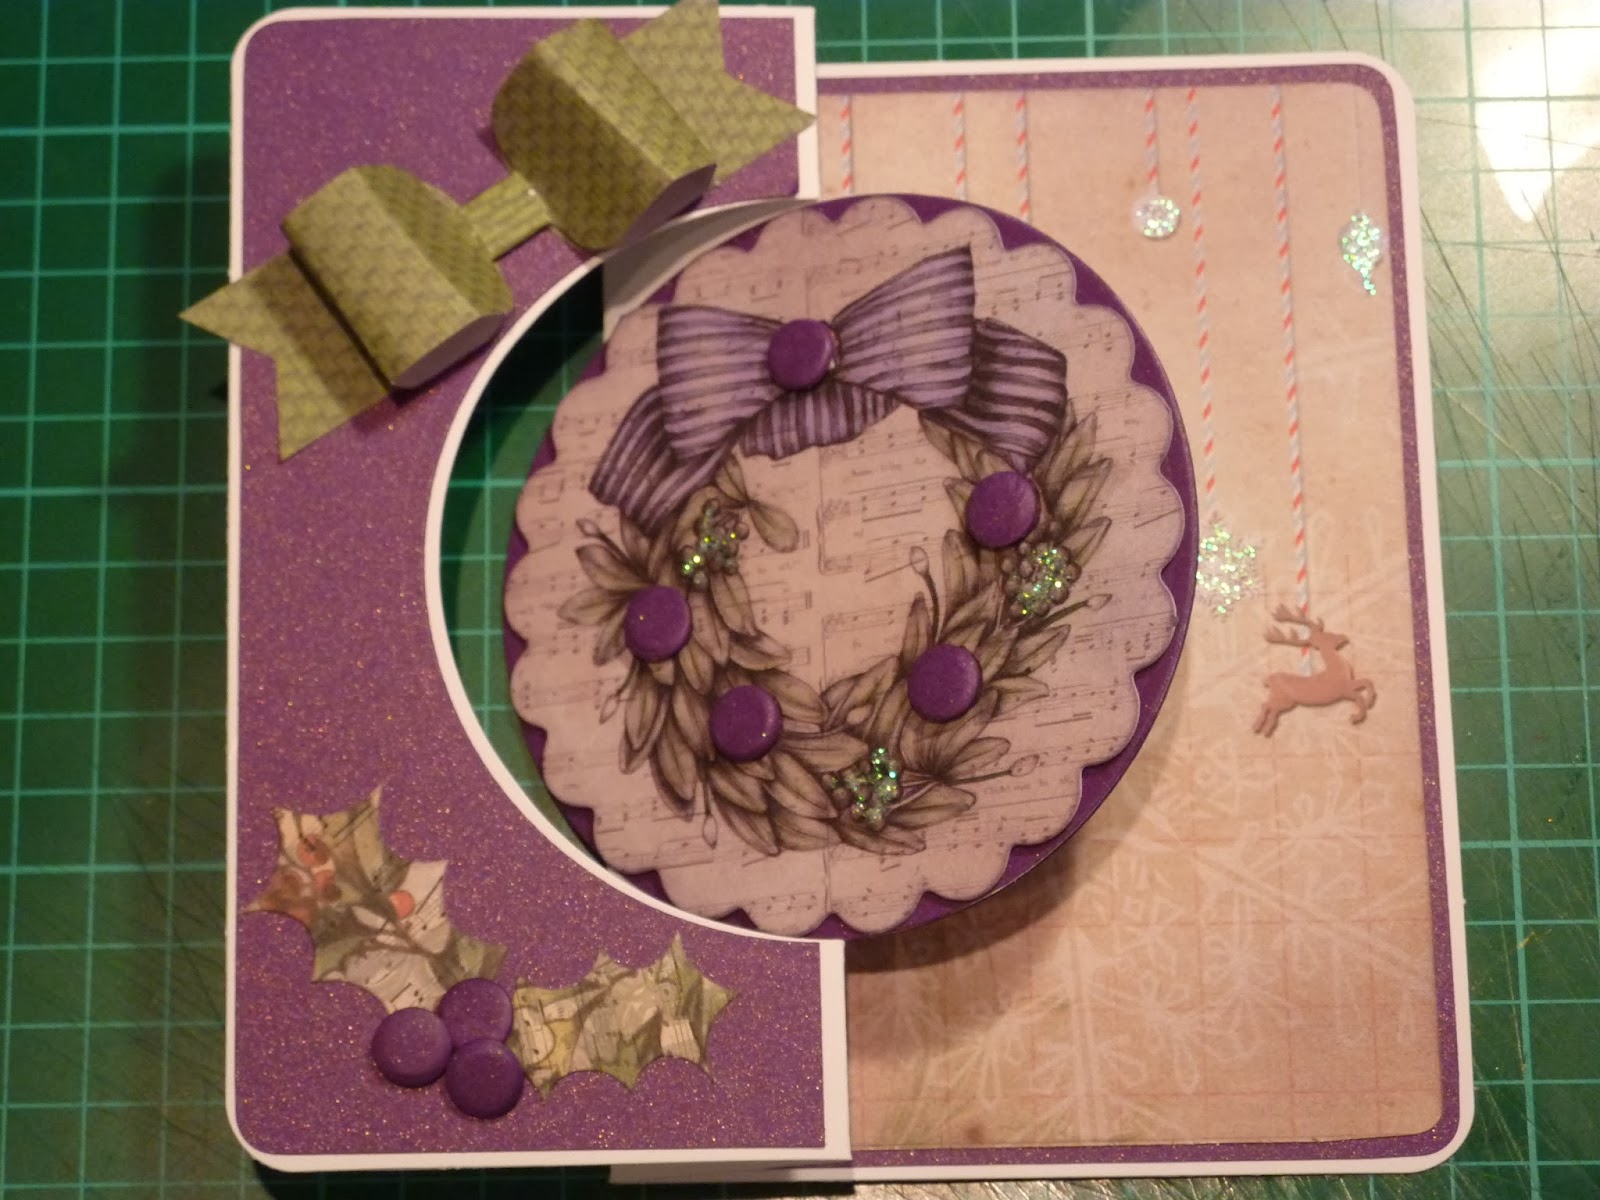
The two cards below are made using the same collection and accessories, again with similar colour tones. I have also used red perfect pearls for the flower centres and found some cream and gold ribbon to add an extra touch. The card on the right was inspired by a card I made at a class this time last year with Lisa Baker, this time adapted for use with the Christmas Post collection. The card has been cut apart with some Hunkydory Snowfall acetate added and then reconstructed again. As Lisa's blog challenge is 'Traditional Christmas' I will enter these for this month...
 

Friday 18 October 2013

Birthday Lovely Lili!

Morning all! This stamp is definitely getting a good run! Again, I love this girly from LOTV, (called Summer Lovely Lilli) and here I have used lots of shades of pink to complement her and make the ultimate, flowery, girly card! I have used my Cricut Storybook cartridge to cut the basic topper shape and again to matt. I have also used the same cartridge to cut some decorative corner flourishes and another, smaller shape to add dimension and layers. The flowers and buttons are from my stash and the papers are from the First Edition Dreamcatcher pad. The main image has been coloured with promarkers and the sentiment has been stamped using a Popcorn sentiment (I think!) As this month's theme for the LOTV challenge blog is 'Anything Goes', I thought she would be perfect to enter!

Friday 11 October 2013

A Hobbit Hole in Autumn

Morning Bloggers! Ok, my husband is a little mad about myth and fantasy too, so I decided to make a card related to 'The Hobbit'. There is nothing like this in the shops; (not that I've seen anyway) I think there is an uncaptured market there... Anyway, this card has been made using loads of my favourite Lavina stamps. The main stamp is appropriately named 'hobbit hole' and the other elements are a mix of foliage, mushrooms and grasses. I have used autumnal distress ink colours which also make it quite manly, and made the topper sentiment on my PC using a piece of Tolkien's poetry. The green background paper I have made using some Indigoblu Morris Dance flake together with a small star Lavina stamp randomly stamped all over the
page. My Husband was pleased with it so I thought I would enter this into Lavinia's new challenge - Autumn colours.                                                                                 

Friday 4 October 2013

Beautiful Belles!

This stepper card was made using the Creative Expressions 'Belle of the Ball' plate. The dress images are so detailed that I did not want to fiddle with them too much, so I decided to simply emboss them. All the stamps used here are from the plate, including the corners and sentiments! I was asked to make some prom cards this year; I think this is a great plate to use!

Thursday 19 September 2013

Card Candi Flowers

 I recently saw some Card Candi stamps that I thought were really simple but effective, so I thought I just had to give them a go! I also just happened to have acquired (!) a few Embossalicious folders which I thought might frame the main image nicely. I like these Crafter's Companion Diesire folders, they are the perfect size for my Big Shot and my usual 6x6 card size! This folder called 'Elegant Frame' gives a great feature to focus the eye. Both these cards are both made using the one of the Woodware Bubble Bloom Card Candi stamps, which also come with the sentiment I have used here. I have stamped them both twice, the second time just cutting out the leaves to coordinate with the main colour I chose. I have tried to go tone in tone with all the embellishments as well, as I thought the main image would look a bit busy otherwise! The ink has been added just to highlight the folders (Tumbled Glass Distress Ink). The card below also utilises one of the Spellbinders D'lites dies to accent the sentiment.

Cosy Friendship Cuddles

Sometimes I think we underestimate the pure value of sending a card just to put a smile on someone's face, so I thought  I would make one to do just that! Feeling in a pinky mood, (can you tell..?) I chose an adorable LOTV image (Milly Cuddle Time) that can make anyone smile! The main image has been coloured with Promarkers, lightly edged with Spun Sugar Distress Ink and cut with basic Spellbinders circle dies. This main topper has then been layered onto a piece of dark red paper cut into a square shape with a border on the side (the fancy border section is a Tim Holtz On the Edge die - Scrollwork); Matching background paper has been matted on top, along with pink lace and thin satin ribbon to edge the work. The large red swirl is a Tim Holtz Bigz die - Elegant Flourishes. The sentiment is another LOTV stamp from a fantastic sentiment set that has a brilliant range to choose from. Again, I have used Spellbinder dies to layer. Finally the flowers have been cut from coordinating plain cardstock using the Heartfelt Creations Sun Kissed Fleur die. I have added little 'stitch' like lines to accent the flowers and papers, along with more Spun Sugar Distress Ink to bring in the edges. The flower centres have been done using Liquid Pearls Rouge. The background papers are from the First Edition Sweet Owl pad.

Thursday 12 September 2013

Fairy Birthday Magic!

This is actually a huge 8x8 card made for my daughter's 9th birthday! The background paper is from a huge DCWV stack called 'Once Upon a Time' which features an ethereal theme (it is hard to use it as I love it so much!) I have mounted onto some dark red paper, picking out the red as my main colour to compliment the vintage browns. The topper has been torn from Neenah card, distressed with Vintage Photo ink and stamped using some beautiful Lavinia fairy, scenery and flower silhouette images. The words are from Katy Sue designs, torn and distressed in the same way. I have cut the flowers using my Cricut Flower Shoppe cartridge, laying up several times with one layer being glittered. The ribbon and gems are from my stash. She loved it! I will be entering this in September's Lavinia blog challenge called 'Add a Flower'.

Thursday 5 September 2013

Style Divas!

 These two cards were made for two friends of mine who are very stylish and chic. They also love vintage things, so I thought I would have a play with some Creative Expressions stamps that jumped into my basket at the last craft show...
The dress form and sentiment stamps are all from the same collection. They have been stamped using brown archival (black in the card below) and then embossed with clear powder to give a lovely sheen. I have used Cosmic Shimmer dark Bronze PVA glue to add the dots to the sides of the image. The top card features 2 embossed panels separated with sparkly brown ribbon and a cameo I made using UTEE, coloured embossing powders and a mould. The feather has been die cut using Spellbinders Jewel Fantasies and the pins are from Creative Expressions as well. The card below features some Kanban Mackensie cardstock with an embossed panel to the top. The black buttons have been tied with raffia and some black lace has been threaded with plain ribbon.

Saturday 31 August 2013

Layering Spellbinders

This card was inspired by Julia Watts from Creative Expressions. I do not often use lots of Spellbinders shapes layered together, but seeing Julia do it, I thought I would give it a go! The main colour was chosen as it was for a lady who loves purple. I started with white card stock and distressed using Milled Lavender and Dusty Concord Distress Inks. I then randomly stamped a flourish stamp I have from Hunkydory. The darker purple panel has been embossed using a Couture Creations embossing folder and edged with lace. The die cut flourishes have been cut using a Tim Holtz Sizzix Bigz die (elegant flourish) and coloured using the same inks as before. The main sentiment is from LOTV and has been layered several times with Persian Spellbinder's dies, Lacey Circles and Basic Circles. The flowers are from my stash. I have used decoupage pads to add some height, so it is quite a fat card!

Saturday 24 August 2013

Thank You Teacher

At the end of another school year it's time to say thank you to those amazing teachers who inspire our little rugrats each day, so I thought I would use Crafter's Companion Popcorn the Bear to help me! I have coloured him using Tim Holtz Distress Markers on watercolour paper and cut out. This topper has then been layered onto a Spellbinder's circle shape to make it pop. The sentiment is a LOTV one. The doily in the background has been coloured using Spiced Marmalade Distress Ink and layered onto some Hunkydory card with a strip of some orange paper I had in my bits box. The butterflies are actually the waste elements cut out when cutting a Spellbinder's Butterfly Circle die!                                                                                

Saturday 17 August 2013

I wonder what she is wishing?

Here is one of those lovely LOTV girlies again (Summer Lovely Lillies)! I have changed colours this time, choosing turquoise as my main focus colour. The background paper is from DCWV and I have added some white embossing. The main image has been stamped onto Neenah card and coloured using Promarkers. I have added some tiny gems to the centre of the flowers to make them pop a little. The base topper shape is a basic shape cut using the Cricut Storybook cartridge, as are the corner embellishments. The raffia, gems and skeleton leaves are from my stash, and the 'Wish' ticket is from Tim Holtz Adage Tickets.

Saturday 10 August 2013

Imagination is the key...

This is a 6x6 card made as a result of me playing with a few techniques. I started with plain white cardstock and lightly distressed all over with some Tim Holtz ink. I then stamped on this randomly using an Indigoblu Flouish stamp in a second generation of the same ink. Finally, I stamped again using the same flourish, this time embossing with Stampendous Frantage powder (amazing stuff!). The powder has white, blue and gold in which gives lovely texture and interest. The brown swirls are a Tim Holtz Sizzix Bigz die and the flowers have been cut using my Cricut Flower Shoppe cartridge. The fairy and mushrooms (Lavinia) were stamped into an image cut from a Cricut Storybook shape. Again I have used 2nd and 3rd generations of ink here, with the fairy being embossed with glittery powder. The text is from Tim Holtz mounted on a Spellbinders D-Lites shape.

Saturday 3 August 2013

First Prom

 These cards were made as I was asked to make a card for an 11 year-old to celebrate her first prom! It needed to be cream and black with a dress on... the perfect excuse to order some more Spellbinders' dies! These are shapes from the dress forms dies and have been layered on some fantastic Kanban cardstock (I think the collection was called Mackensie).  I have also used neutral cardstock from my stash to make the die cuts pop. The layering shapes are Spellbinders shapes (petals, jewelled fantasies) with some small punched flowers from matching card. The ribbon is from Creative Expressions and the gems from my ever-growing stash!

Saturday 27 July 2013

Magical Dandelions

Back to fairies! This is a simple little card, using some fairy and dandelion stamps from Lavinia. I have stamped the dandelion heads at different heights, some using white ink and some using a starlight silver (both Dewdrop pads). I have added some stickles to the flower heads to add some dimension and interest. The fairies have been embossed in silver with silver ribbon and a matching sentiment to finish (a Crafter's Companion Fairyopolis sentiment).

Saturday 20 July 2013

August Birthday

This card was inspired by colour! I wanted to make a card for someone who loved oranges and browns, so I decided to play a little! The grasses and flower stamps are from Lavina as well as some of her smaller silhouette flowers. The sentiment is from Clarity stamps. I have created the illusion that the stem are larger by adding a large punched border and stamping either side of them. I used a Big and Juicy Spice ink pad to add some depth to the colour and graduation. The flowers have been punched and coloured using the same ink and the card edges also distressed.

Saturday 13 July 2013

Butterfly Montage

This card is an example of me playing with some montage-style effects! Both the main image and the quote, (or should I say 'stanza' of the poem) are from Clarity Stamps. I have used Neenah card to stamp onto and Distress Inks (milled lavender and brushed corduroy) to colour in with. The big stamp is one large montage stamp  which has been stamped several times and sections taken from each image to add depth. and texture. I have coloured certain elements of the stamp to add focus and draw the eye in. To make the word panel, I have created my own backing paper using a stamp featuring grasses and a small butterfly (also by Clarity). These images have been stamped using 2nd and 3rd generation ink in the same colours as before. The main poem has been stamped in black Archival ink. Finally I have added organza in the background and gems added to finish.

Saturday 6 July 2013

A 'Cracking' Vintage!

This card was made using stamps from Rubbernecker Stamps (Creative Expressions). I have made my own background paper using a wine label stamp and some Tim Holtz Vintage Photo ink (also used around the edges). The black panel has been clear embossed with the same image. The foremost topper has been stamped with a wine bottle stamp and triple embossed with UTEE. I then placed into the freezer for a short time to allow it to cool down, before bending it to get the 'cracked' vintage look. The sentiment stamp is from the same range by Creative Expressions. The flowers are from Kanban and the raffia has been added to create a 'posh' wine bottle feel!

Saturday 29 June 2013

Getting Better With Age!

This card was made as part of a request; I needed to make a men's birthday card with a 'wine' theme. I happened to pop some Rubbernecker stamps (Creative Expressions) into my basket at one of the Ali Pally shows, so they were perfect for this theme! I have used Kanban backing paper to add interest and then layered with co-ordinating card mounting using Spellbinders Labels dies through my Big Shot. The colours were all done using Distress Inks - Vintage Photo, Peeled Paint, Scattered Straw and a touch of red from a Cat's Eye red pad I had. The ribbon is some of the 'vintage ribbon' Sue Wilson uses. 

Saturday 22 June 2013

Mermaid fun!

Although my blog has been a little quiet of late, I promise I have been busy! I do need to post more regularly though... This is the card I made for my husband's birthday using stamps I bought at the Ali Pally show from Creative Expressions. I have stamped the scene masking as I went, and coloured using Promarkers. The tail of the mermaid has been glittered using lots of Stickles. It is quite liberating doing funny cards; I may have to add to this range...

Friday 14 June 2013

Vintage Anniversary Steampunk

This card was made using a main image from a MCS Steampunk CD and lots of other bits and bobs I have acquired along the way! I wanted to make an anniversary card that was a little different and with a vintage theme. I have used a basic oval Spellbinder's die to encase the girl, and distressed the main image with Tim Holtz Vintage Photo inks. I have also distress the other layers of the card, using autumnal colours and craft card to back the design. Spellbinders Persian accents have added some corners to the top of the easel, and the flowers have been punched from stamped cardstock (text stamp). There is also a piece of vintage cream ribbon running through the ribbon threader die (Marianne Die) and lots of Creative Expressions diamonds and pearls dotted around to add that final touch! The sentiment I created myself on the computer as I could not find one I liked at the time (fussy, I know!).

Friday 7 June 2013

Alien fun!

Love these guys; smiling aliens! These fellows are from Creative Expressions. There are lots of alien themed stamps and accompanying images to enhance them. I have chosen 3 of the characters to be my toppers and also used a sentiment from the range as well as a large ship stamp to use in the background. The men have been coloured in shades of blue using Promarkers and their features highlighted using pale blue and white highlights using Liquid Pearls. This was made for a 7 year-old's birthday. I had lots of fun with these; the beauty with aliens is that there are no rules!

Saturday 1 June 2013

Cheers!

  Ok, slight variation on a theme here, going to that tricky theme of 'Mens' Cards'.  I have used a stamp plate by Sheena Douglass here, it features a large pub and lots of extras to create scenes with. I have made these cards very simple, with the embossed word 'cheers' as the background paper and just a couple of the images stamped and embossed on the topper. The images have been coloured using Cosmic Shimmer watercolour paints and the edges distressed with Crushed Olive Distress Ink.


This second card has used the same basic format, but with some fauna from the same plate stamped on the edges. The fauna has been stamped with some greens from the Versamark  Dew Drops range. The rest of the card has been done the same way as the one above.

Powered By Blogger